Project I
|
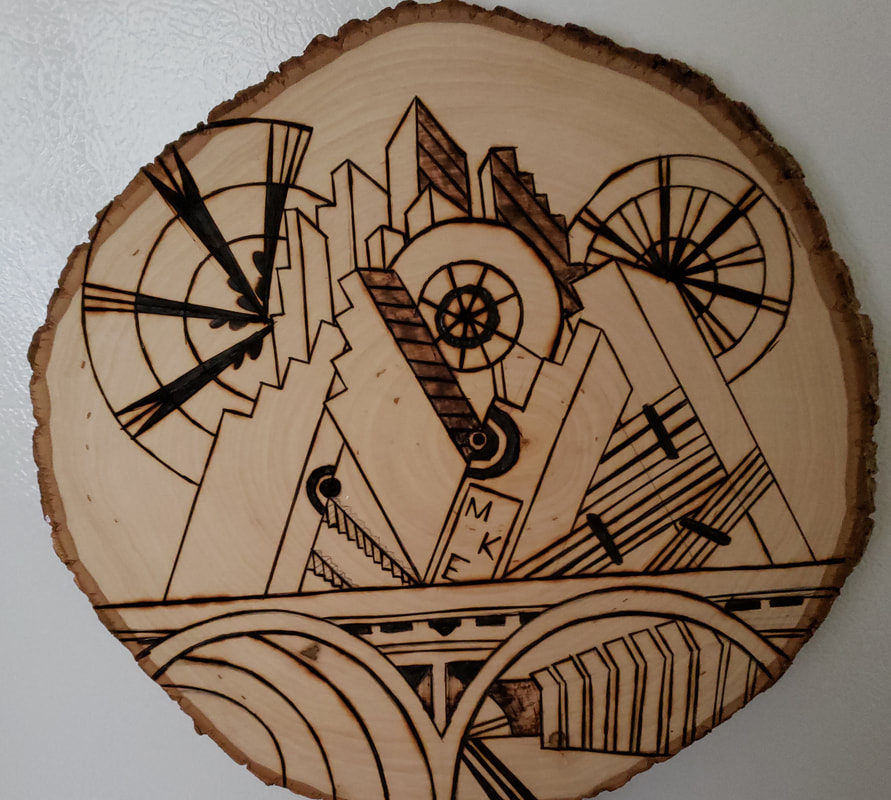
City and Circles
Wood Burning September 2021 City and Circles is a wood burning version of Skyscrapers and Tunnel by Fortunato Depero with a different background and less on the sides to present to the eye. It shows the liveliness within the city and movement that is given from the lines and semi circles. |
Inspiration

|
Fortunato Depero
I wanted this project to be heavily referencing Depero, so I decided to go with Grattacieli e tunnel (Skyscrapers and Tunnel). I was looking for something more geometrical and bold compared to other projects I've done. Depero has a very different style to what I have done before which is futurism. It has a very geometrical look with colors that seem rusty and not too bold. Within it there is liveliness and an image with movement to represent of when Fortunato Depero went to New York City. I wanted to do something similar so I did it with my town, Milwaukee. |
Planning

I started off first with creating an oval like shape since I knew the wood log wasn't an exact perfect circle. Since Fortunato Depero's art piece is a rectangle, close to a square, I had to note that I would have to cut some things out. Since it was more oval shape I wanted to check how it would look like if I put the image vertically on there, giving it more length but less width.
|

After having some of the sketch out for the first one, I wanted to see how it would look like if adding the image horizontally to the log, giving it more width to the image. I first started both images by sketching a line out by eyeing where to cut in half and then found the half of that half to add the tunnels on the bottom fourth of the area.
|
Process and Experimentation

|
I first started off by using some wood that I know I wasn't going to be using for the final product, and was trying out the different points that the tool came with. There was a very fine point one that didn't really show much on the wood since it would only scratch it off and leave lines but there wouldn't be any burn marks unlike the more thicker points. The lines wouldn't be as noticeable from the fine points seeing from the image, where the darker lines are from the chisel tip. |
|
When I finished checking the chisel tip and also testing how it would look like attempting to do curved lines, I tried out the shading tip that was shaped as a tear drop. I was trying to see how to exactly shade by kind of burning the area close by and not leave it on too long in order to not be burned all the way but give it a more light shade. |

|

|
After experimenting with the different tips and deciding which ones I favored more which was mainly the chiseled tip and once I picked them out I started sketching on the wood piece the bottom half in order to have the circular shapes on there and the base that I started off with. Once I got the tunnels down I added to top half splitting the tunnels from the buildings. I started from top to bottom in order to get the bigger areas first. |
|
Once I started with one, I was able to know where to place the others and also the circular shapes to the detail of how many curves I will be making. I also shaded the parts that were going to be fully burned for shade. Also with the lines that were closer to one another I left a gap that would also be fully burned instead of having a gap between burns. I then left the outline like that and would later add the other curved areas after started to burn the tunnels. |

|

|
I first wanted to start off with the lines in the tunnels because they were straight lines so it would be better to start off with someone that I was more confident in doing. I would start erasing the extra lines that were used but weren't going to be burned. I used the chisel tip to burn the straight lines and started to also notice the light shade it would leave next to the lines. |
|
(Insert image of the tunnels burned lines) Once finishing up with the lines inside the tunnels, I decided to stay with the chisel tip and burn the curves with it since it started getting easier to use it for the other parts of it. Instead of rotating the piece of wood at an angle and then burning the line, I would stand up and either move my body the same direction the curve was going so then I would have a steady hand and not go directly straight. Another method was slowly rotating the piece of wood with one hand and burning the curve with the other hand. With that method I would have to keep in place the wood with a firm hand and also move it carefully without letting it slip.
|

|

|
After burning the lines for the tunnel section. I did the buildings' outlines, and also attempted to do the circular shapes between and around them. Since the buildings were just outlines of them, there was a lot of space within them so I decided to give it a more shaded side by using the shading point. The amount of experience I have in this medium is very limited so I did it to these three buildings first and then kind of added a layer above it by adding lines to give it like a wall with texture and lines. With the flow point, a smooth ball curved point, I did some of the circular shapes and were going to be boldly shaded to cover more of a thicker line but not as straight and geometrical looking if it was with the chisel tip. |
|
Once I started adding the circular shapes surrounding the buildings, I went back to the chisel tip to use it on these seeing as the curves were wider and not as small as the ones in the middle. The smaller would make it harder to use a straight line to burn them which is why I would use the shading point by using the tip of it or the flow tip to get thicker lines. Using the chisel tip on the bigger curves is easier for me which is why I used it when doing these shapes. I used the method of just moving with the hand in order to keep it steady and not having my arm do a while 180 degree turn. With the chisel tip it also have a thinner line too which is something I was aiming towards when burning these. |

|
Compare & Contrast
|
Compare
|

Contrast
|
Reflection
This wood burning project was something new to me medium wise, but I enjoyed learning new techniques. This was something I had wanted to try out before and with Fortunato Depero's art I was able to make this project with it's geometrical look. Using the chisel tip as my main point, I was able to learn the basic on burning straight lines and also using it for curved areas. Something I would improve on it the shading point given from the lacks of it in some areas and something I liked in the end results were the curved areas such as the tunnels themselves because it was a challenge but tested my skills to a certain extent.
ACT Questions
1. Clearly explain and describe how you are able to identify the cause-effect relationships between your inspiration and its effect upon your artwork.
City and Circles is heavily referencing the New York view in Skyscrapers and Tunnel so it is a given from their relationship with each other.
2. What is the overall approach (point of view) the author (from your research) has regarding the topic of your inspiration?
Depero captured New York City for the city it is such as of its boldness with rust but movement and liveliness that never really stops even late at night.
3. What kind of generalizations and conclusions have you discovered about people, ideas, cultures, etc. while you researched your inspiration?
Depero gives the angles and slants of the artwork's towers and gives it signs and stairs to give it direction, and movement in order to show New York in the way Fortunato Depero saw it.
4. What was the central idea or theme around your inspirational research?
Mine was to show my own city (Milwaukee) for the city it is without the useage of color but giving movement and peace at the bottom.
5. What kind of inferences (conclusions reached on the basis of evidence and reasoning) did you make while reading your research?
Depero worked on many other things from the looks of it given from the sign "ROXY TEA" also known as Roxy Theater.
Bibliography
Center for Italian Modern Art. “Depero and the Metropolis.” Center for Italian Modern Art, 9 May 2019, https://www.italianmodernart.org/depero-and-the-metropolis/.
